在大佬的推荐下接触了OpenSK,一个开源的安全密钥实现,支持FIDO U2F标准(双因子认证)和FIDO2规范。目前OpenSK支持的硬件主要是基于nordic的nRF52840芯片的三款产品:
前两者算是nordic自产自销的,最后一款则是深圳的一家企业Makerdiary生产的usb设备,价格相对实惠一些(关键是有OpenSK官方支持且淘宝买得到)。我们使用的是makerdiary家的nRF52840-MDK USB Dongle,淘宝链接在文章最底部。
安装OpenSK
整个安装过程主要分为两步:刷入UF2 BootLoader和刷入OpenSK
刷入UF2BootLoader
首先检查板子是否已经刷入了UF2BootLoader:
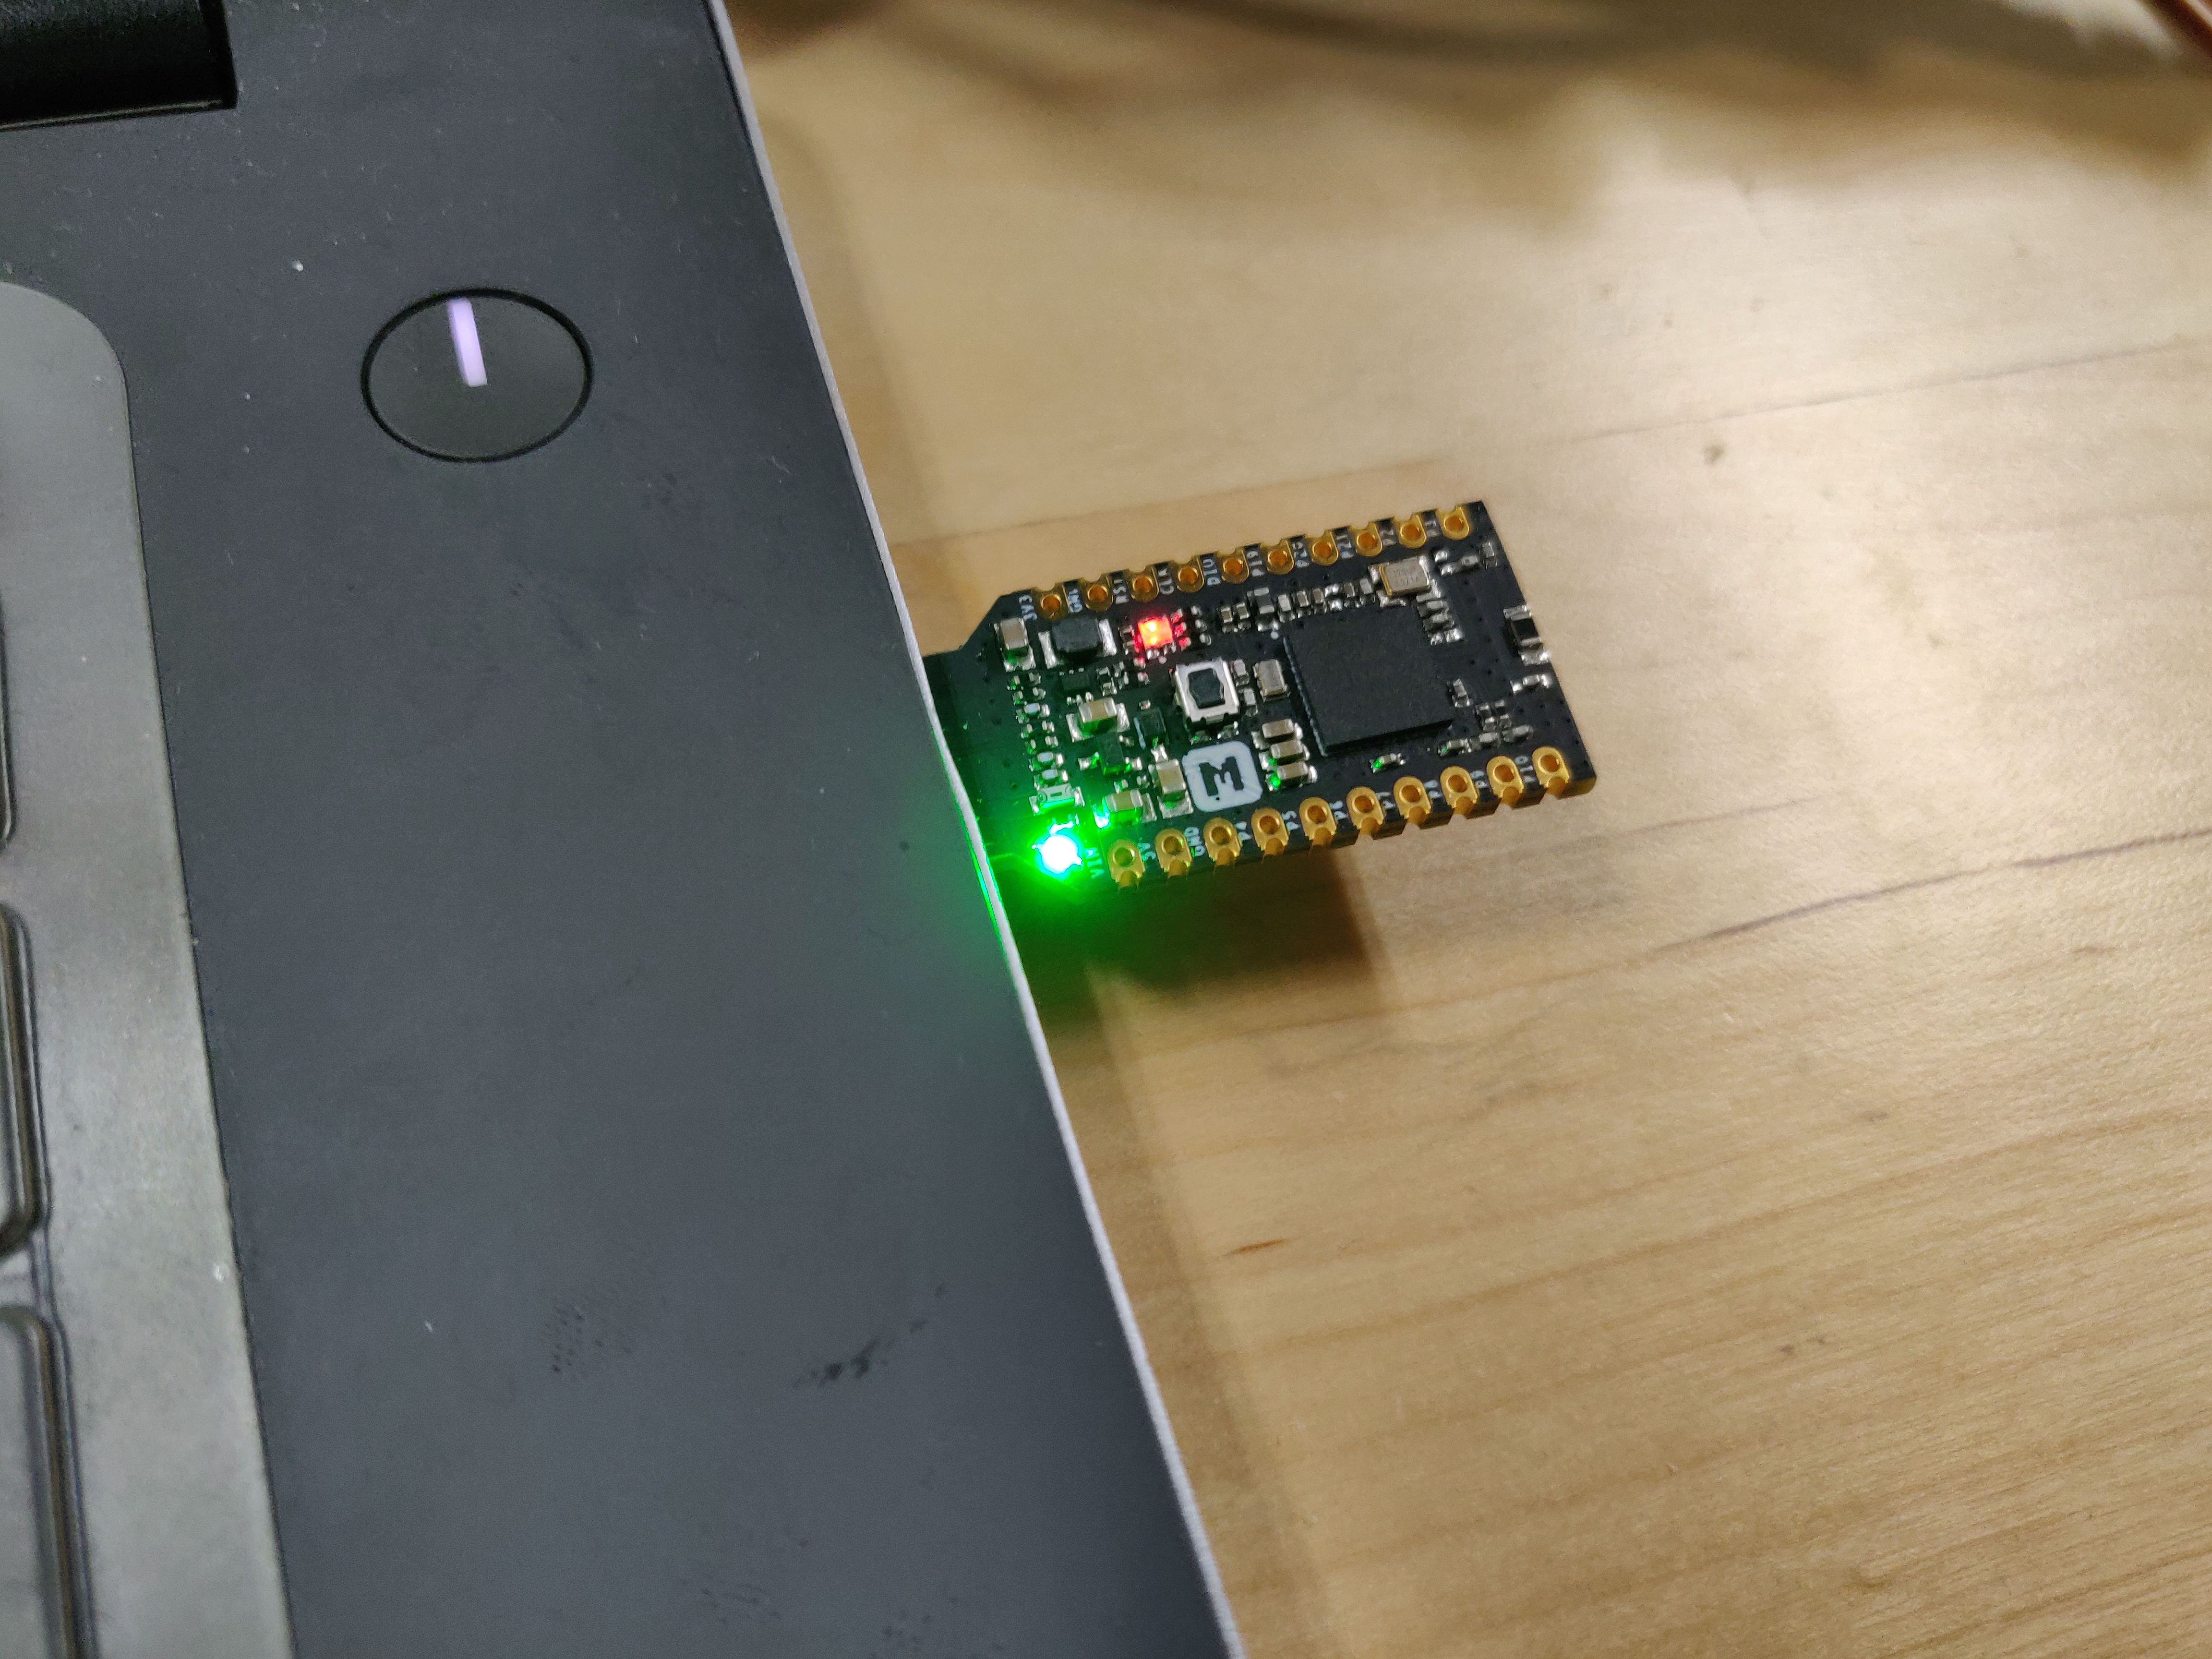
按住板子的reset键插入PC,左上方的绿色电源指示灯亮起,如果同时还有另一颗绿灯亮起且出现名为MDK-Dongle的U盘,则说明已经刷入了UF2BootLoader,可以跳过该步骤,否则需要刷UF2BootLoader。
首先安装nrfutil:
sudo pip install nrfutil
从店家的github上下载预编译好的UF2BootLoader:
wget https://github.com/makerdiary/nrf52840-mdk-usb-dongle/raw/master/firmware/open_bootloader/uf2_bootloader-0.2.13-44-gb2b4284-nosd_signed.zip
用nrfutil刷入UF2BootLoader:
nrfutil dfu usb-serial -pkg uf2_bootloader-0.2.13-44-gb2b4284-nosd_signed.zip -p <your-serial-port-name>
其中<your-serial-port-name>取决于你的电脑和你的板子,比如在我的电脑上是:
/dev/serial/by-id/usb-MakerDiary_nRF52840_MDK_USB_Dongle_0E648D428B58FE7A-if00
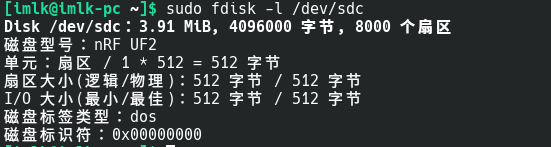
刷完之后会出现一个名为MDK-Dongle的U盘设备/dev/sdc:

刷入OpenSK
从github上下载预编译好的OpenSK固件:
wget https://github.com/makerdiary/nrf52840-mdk-usb-dongle/raw/master/firmware/OpenSK/opensk_nrf52840_mdk_usb_dongle_gece14d7.uf2
长按reset键讲板子插入PC,挂载出现的名为MDK-Dongle的U盘设备:
将我们的固件拷贝进去
cp ./opensk_nrf52840_mdk_usb_dongle_gece14d7.uf2 /run/media/imlk/MDK-DONGLE/

拷贝过程约20s,期间指示灯会变成闪烁的红色:
命令结束之后红灯变绿并熄灭,用lsusb可以看到该设备:

现在我们的固件已经写好了,可以在https://webauthn.io/上或者Windows10登录选项中进行测试了。
编译OpenSK固件
店铺的GitHub仓库(https://github.com/makerdiary/OpenSK)是基于老版本的OpenSK做的适配,店家说新版本修复了不少bug,而OpenSK官方仓库(https://github.com/google/OpenSK)对于makerdiary家的这款nRF52840-MDK USB Dongle已经做了适配了,因此我们直接用google的仓库编译:
参考官方教程:https://github.com/google/OpenSK/blob/master/docs/install.md
git clone [email protected]:google/OpenSK.git
官方的OpenSK在刷入后会清空UICR(user information configuration registers),这会导致BootLoader的入口地址被清除掉,因此用UF2BootLoader刷入OpenSK后会导致进不去UF2BootLoader
如果已经因为该原因而进不去UF2BootLoader,可以参考下一节用J-Link给nRF52840刷BootLoader清空数据再重新刷入BootLoader。
为了避免该问题我们需要对源码进行一些修改,防止清空UICR:
首先确保你的当前工作目录是OpenSK源码根目录,执行下面的命令将创建一个名为./patches/tock/99-avoid-erasing-uicr.patch的patch
cat << EOF > ./patches/tock/99-avoid-erasing-uicr.patch
diff --git a/boards/nordic/nrf52_components/src/startup.rs b/boards/nordic/nrf52_components/src/startup.rs
index 9ddb414fd..5e85da513 100644
--- a/boards/nordic/nrf52_components/src/startup.rs
+++ b/boards/nordic/nrf52_components/src/startup.rs
@@ -29,68 +29,68 @@ impl Component for NrfStartupComponent {
     type StaticInput = ();
     type Output = ();
     unsafe fn finalize(self, _s: Self::StaticInput) -> Self::Output {
-        // Make non-volatile memory writable and activate the reset button
-        let uicr = nrf52::uicr::Uicr::new();
-
-        // Check if we need to erase UICR memory to re-program it
-        // This only needs to be done when a bit needs to be flipped from 0 to 1.
-        let psel0_reset: u32 = uicr.get_psel0_reset_pin().map_or(0, |pin| pin as u32);
-        let psel1_reset: u32 = uicr.get_psel1_reset_pin().map_or(0, |pin| pin as u32);
-        let mut erase_uicr = ((!psel0_reset & (self.button_rst_pin as u32))
-            | (!psel1_reset & (self.button_rst_pin as u32))
-            | (!(uicr.get_vout() as u32) & (self.reg_vout as u32)))
-            != 0;
-
-        // Only enabling the NFC pin protection requires an erase.
-        if self.nfc_as_gpios {
-            erase_uicr |= !uicr.is_nfc_pins_protection_enabled();
-        }
-
-        if erase_uicr {
-            nrf52::nvmc::NVMC.erase_uicr();
-        }
-
-        nrf52::nvmc::NVMC.configure_writeable();
-        while !nrf52::nvmc::NVMC.is_ready() {}
-
-        let mut needs_soft_reset: bool = false;
-
-        // Configure reset pins
-        if uicr
-            .get_psel0_reset_pin()
-            .map_or(true, |pin| pin != self.button_rst_pin)
-        {
-            uicr.set_psel0_reset_pin(self.button_rst_pin);
-            while !nrf52::nvmc::NVMC.is_ready() {}
-            needs_soft_reset = true;
-        }
-        if uicr
-            .get_psel1_reset_pin()
-            .map_or(true, |pin| pin != self.button_rst_pin)
-        {
-            uicr.set_psel1_reset_pin(self.button_rst_pin);
-            while !nrf52::nvmc::NVMC.is_ready() {}
-            needs_soft_reset = true;
-        }
-
-        // Configure voltage regulator output
-        if uicr.get_vout() != self.reg_vout {
-            uicr.set_vout(self.reg_vout);
-            while !nrf52::nvmc::NVMC.is_ready() {}
-            needs_soft_reset = true;
-        }
-
-        // Check if we need to free the NFC pins for GPIO
-        if self.nfc_as_gpios {
-            uicr.set_nfc_pins_protection(true);
-            while !nrf52::nvmc::NVMC.is_ready() {}
-            needs_soft_reset = true;
-        }
-
-        // Any modification of UICR needs a soft reset for the changes to be taken into account.
-        if needs_soft_reset {
-            cortexm4::scb::reset();
-        }
+        // // Make non-volatile memory writable and activate the reset button
+        // let uicr = nrf52::uicr::Uicr::new();
+
+        // // Check if we need to erase UICR memory to re-program it
+        // // This only needs to be done when a bit needs to be flipped from 0 to 1.
+        // let psel0_reset: u32 = uicr.get_psel0_reset_pin().map_or(0, |pin| pin as u32);
+        // let psel1_reset: u32 = uicr.get_psel1_reset_pin().map_or(0, |pin| pin as u32);
+        // let mut erase_uicr = ((!psel0_reset & (self.button_rst_pin as u32))
+        //     | (!psel1_reset & (self.button_rst_pin as u32))
+        //     | (!(uicr.get_vout() as u32) & (self.reg_vout as u32)))
+        //     != 0;
+
+        // // Only enabling the NFC pin protection requires an erase.
+        // if self.nfc_as_gpios {
+        //     erase_uicr |= !uicr.is_nfc_pins_protection_enabled();
+        // }
+
+        // if erase_uicr {
+        //     nrf52::nvmc::NVMC.erase_uicr();
+        // }
+
+        // nrf52::nvmc::NVMC.configure_writeable();
+        // while !nrf52::nvmc::NVMC.is_ready() {}
+
+        // let mut needs_soft_reset: bool = false;
+
+        // // Configure reset pins
+        // if uicr
+        //     .get_psel0_reset_pin()
+        //     .map_or(true, |pin| pin != self.button_rst_pin)
+        // {
+        //     uicr.set_psel0_reset_pin(self.button_rst_pin);
+        //     while !nrf52::nvmc::NVMC.is_ready() {}
+        //     needs_soft_reset = true;
+        // }
+        // if uicr
+        //     .get_psel1_reset_pin()
+        //     .map_or(true, |pin| pin != self.button_rst_pin)
+        // {
+        //     uicr.set_psel1_reset_pin(self.button_rst_pin);
+        //     while !nrf52::nvmc::NVMC.is_ready() {}
+        //     needs_soft_reset = true;
+        // }
+
+        // // Configure voltage regulator output
+        // if uicr.get_vout() != self.reg_vout {
+        //     uicr.set_vout(self.reg_vout);
+        //     while !nrf52::nvmc::NVMC.is_ready() {}
+        //     needs_soft_reset = true;
+        // }
+
+        // // Check if we need to free the NFC pins for GPIO
+        // if self.nfc_as_gpios {
+        //     uicr.set_nfc_pins_protection(true);
+        //     while !nrf52::nvmc::NVMC.is_ready() {}
+        //     needs_soft_reset = true;
+        // }
+
+        // // Any modification of UICR needs a soft reset for the changes to be taken into account.
+        // if needs_soft_reset {
+        //     cortexm4::scb::reset();
+        // }
     }
 }

EOF
在进行上述修改后,我们再开始初始化:
./setup.sh
通过nrfutil部署到我们的板子上,注意改成nrf52840_mdk_dfu:
./deploy.py --board=nrf52840_mdk_dfu --opensk --programmer=nordicdfu
这一步会报错fatal: Couldn't find any DFU device on your system.,看源码似乎在寻找一个vendor_id == "1915"并且product_id == "521F"的设备,猜测是因为刷了UF2BootLoader的原因才导致找不到设备。
那我们就采用别的方法,编译成.uf2文件,通过UF2BootLoader烧写。
./deploy.py --board=nrf52840_mdk_dfu --opensk --programmer=none
执行完毕后会在生成一个合并后的.hex文件target/nrf52840_mdk_dfu_merged.hex
接下来从店家的github下载uf2conv.py这个工具
wget https://github.com/makerdiary/nrf52840-mdk-usb-dongle/raw/master/tools/uf2conv.py
把.hex转化成.uf2
python uf2conv.py -c -f 0xada52840 -o ./target/nrf52840_mdk_dfu_merged.uf2 ./target/nrf52840_mdk_dfu_merged.hex
按住reset按钮,将板子插入PC,拷贝uf2到板子中
cp ./target/nrf52840_mdk_dfu_merged.uf2 /run/media/imlk/MDK-DONGLE/
等上面的程序结束后,红灯变绿并熄灭,lsusb查看到新的设备

至此刷写完成
用J-Link给nRF52840刷BootLoader
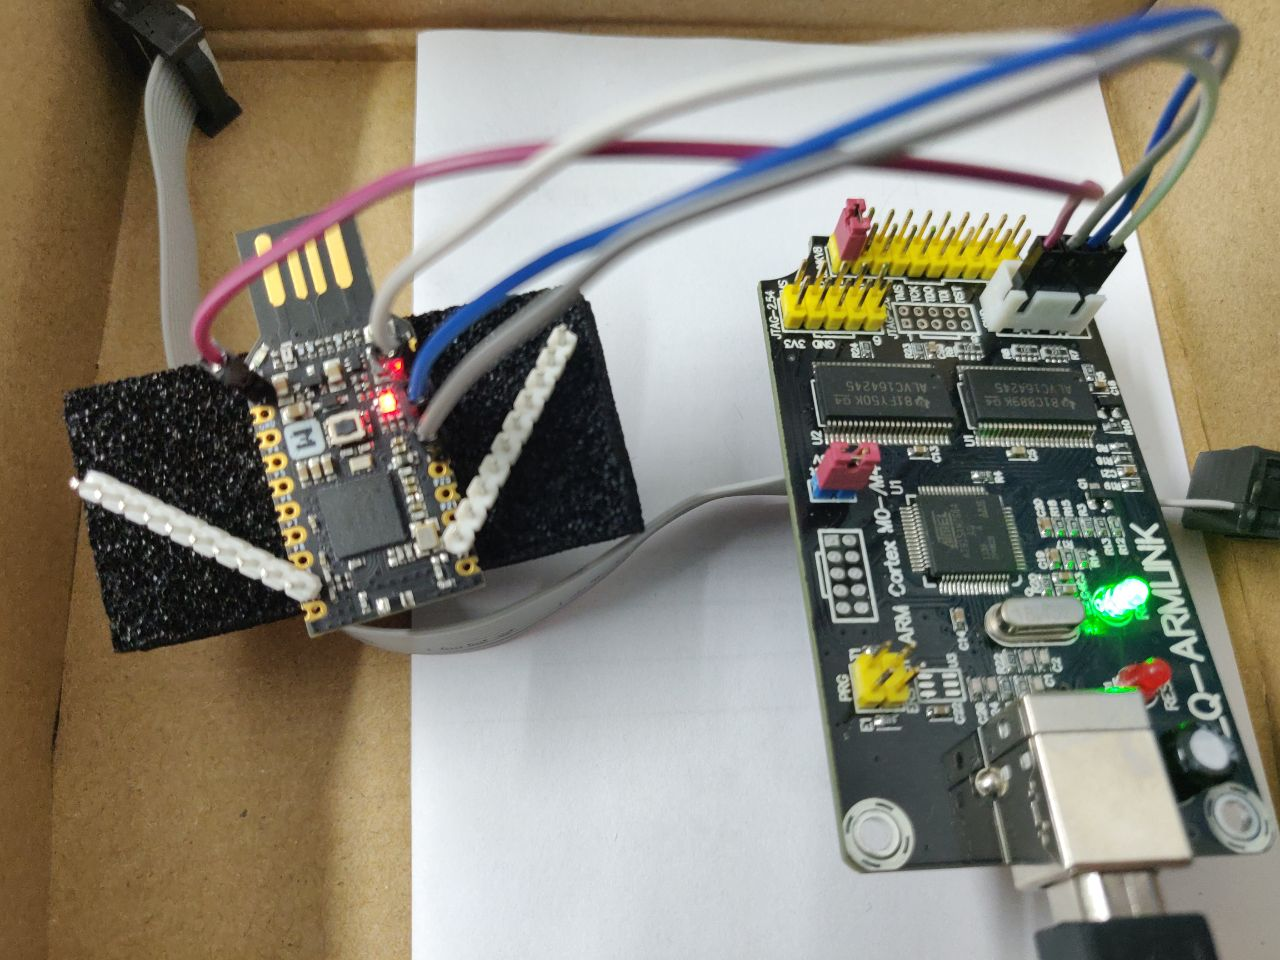
在刷固件的过程中,我们可能会因为填错基地址而无意中覆盖掉flash中重要的部分,此时可以进入dfu模式使用nRF Connect中的Programmer工具刷写固件,但是有时候我们把BootLoader刷掉了,而板子上的App又覆盖了rest按钮的逻辑,或者其他原因导致我们进不去dfu模式,我们还是有办法救回来的。nRF52840这颗SoC包含SWD接口,我们可以用一个J-Link编程器连接板子和pc,然后使用nRF Connect对其进行编程。
连接方式如图所示,右侧是一个J-Link编程器,我们将它的外壳拆下,找到里面的一组swd接口(3.3VCC)、DIO、CLK、GND),对应将其连接到左边的板子上的(VIN、SWDIO、SWDCLK、GND):
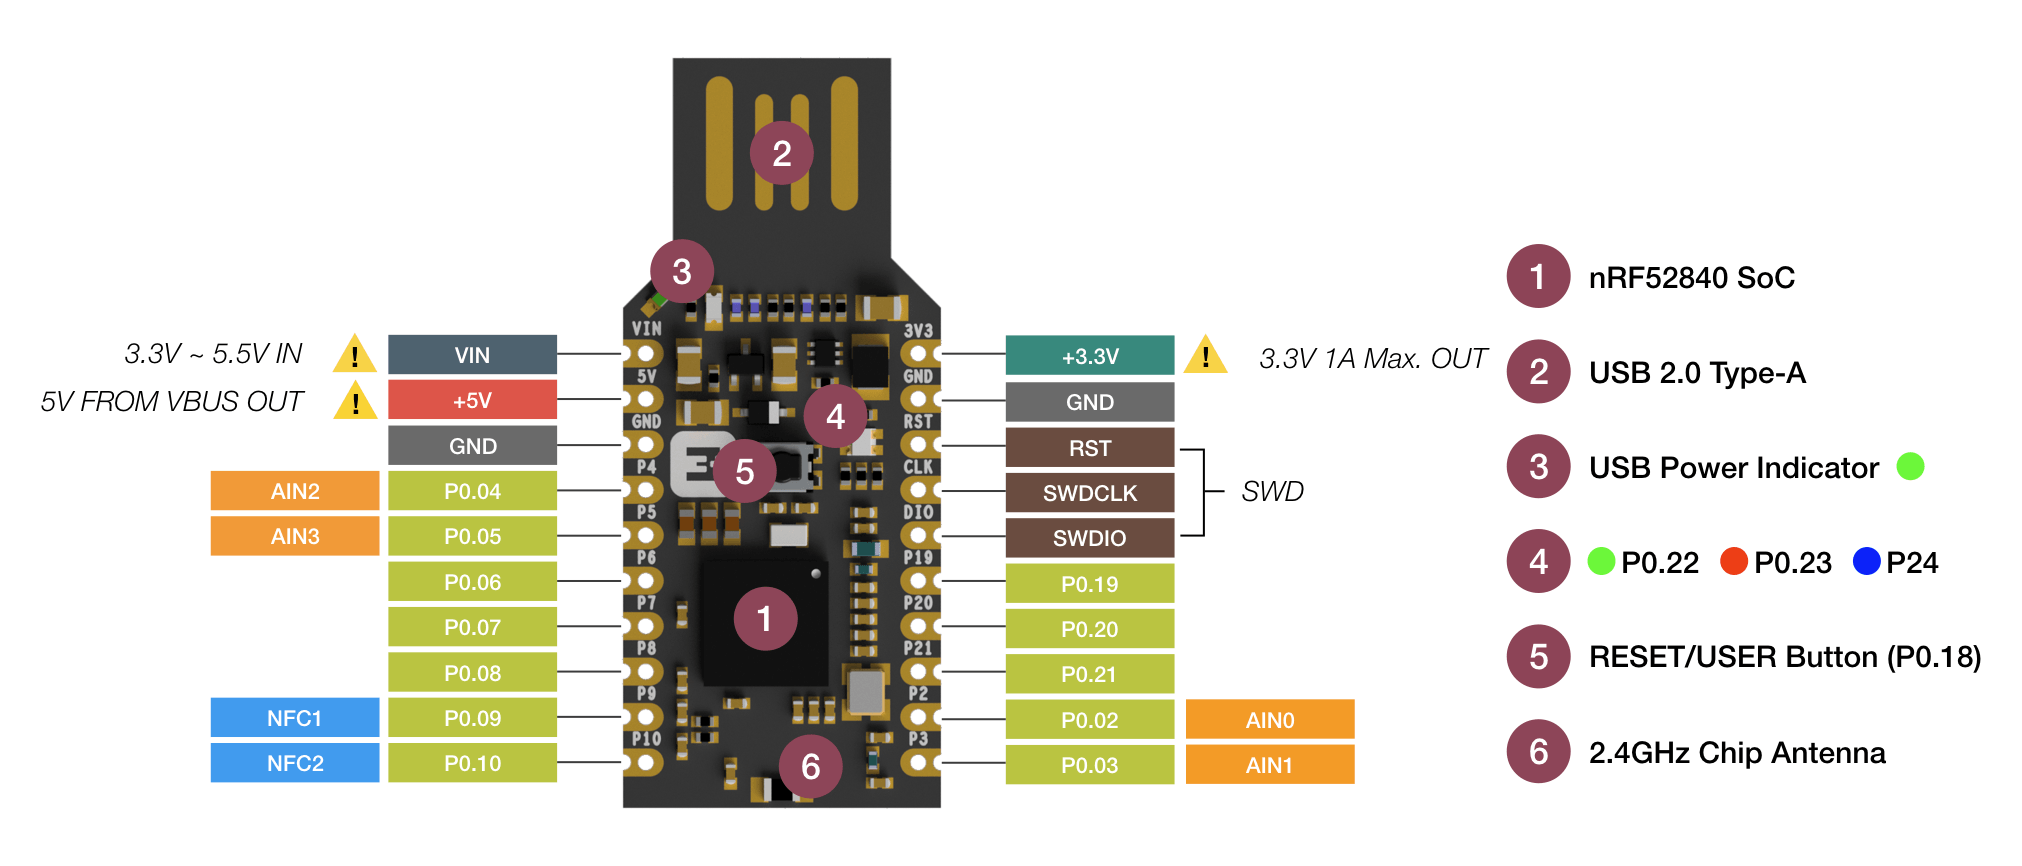
板子的引脚图(源自https://wiki.makerdiary.com/nrf52840-mdk-usb-dongle/#software-resource)
将J-Link连接到PC,可以看到我们连接到了J-Link设备。
[imlk@imlk-pc ~]$ lsusb
...
Bus 001 Device 087: ID 1366:0101 SEGGER J-Link PLUS
...
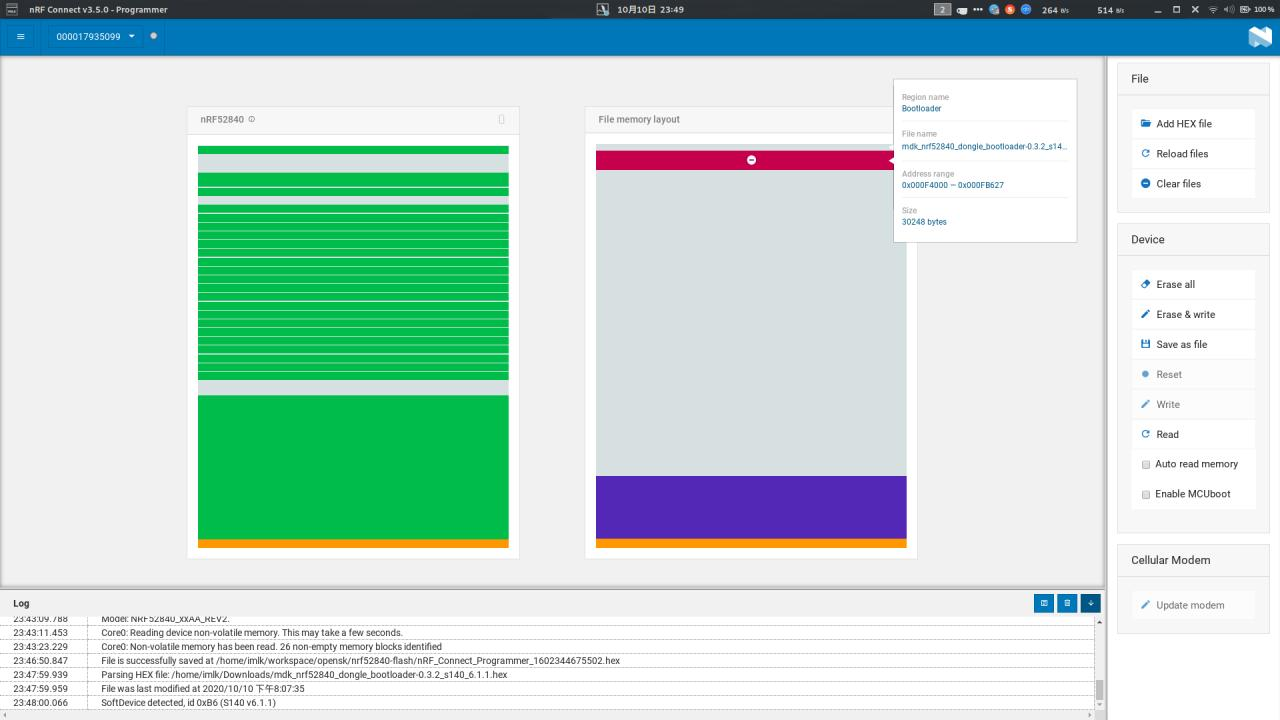
此时打开nRF Connect中的Programmer工具,左上角应该能够看到我们的设备了:
在当前页面中,你可以读取、擦除设备中的数据,具体的内存布局可以从NORDIC的官方文档中找到:https://infocenter.nordicsemi.com/index.jsp?topic=%2Fcom.nordic.infocenter.sdk5.v15.3.0%2Flib_bootloader.html&cp=5_0_3_5_0_7&anchor=lib_bootloader_memory。
通过导入BootLoader的hex文件,然后点击Erase & Write,可以擦除全部数据并写入BootLoader。
可以在这里下载makerdiary预编译的UF2BootLoader的hex文件:https://github.com/makerdiary/nrf52840-mdk-usb-dongle/tree/master/firmware/uf2_bootloader
用OpenSK实现Linux登录(失败)
遇到的问题是执行pamu2fcfg命令后,按下板子上的按钮会出现error: fido_cred_verify (-7) FIDO_ERR_INVALID_ARGUMENT的错误,没找到解决办法
暂时把找到的资料堆在这里,等成功了再更新:
https://sites.google.com/site/mtrons/howtos/bake-your-own-security-key
https://schulz.dk/2019/08/23/using-solokey-for-linux-login/
https://schulz.dk/2019/08/24/password-less-linux-login-with-solokeys/
相关链接
创客日记-Google OpenSK 快速入门指南 https://zhuanlan.zhihu.com/p/109631580
makerdiary的OpenSK仓库 https://github.com/makerdiary/OpenSK
makerdiary的博客 https://wiki.makerdiary.com/nrf52840-mdk-usb-dongle/opensk/getting-started/
nRF52840-MDK USB Dongle淘宝链接: https://item.taobao.com/item.htm?spm=2013.1.w4004-18605444720.4.54af5ff1ndQwhn&id=578378054977
Erase UICR and merge Bootloader problem https://devzone.nordicsemi.com/f/nordic-q-a/50948/erase-uicr-and-merge-bootloader-problem